ASDK渲染原理

基础知识

RunLoop

UIView的生命周期

某个视图的层次一改变,该视图就会收到一次回调。

  1. 调用addSubivew:成功后会给该视图发送didAddSubivew:回调,触发UIView的子类在心增视图时执行其他操作。
  2. didMoveToSuperview:会通知相关视图他们的上级视图已经变化。添加和移除都会调用,所以要判断 superView在不在
  3. 视图移动前会发出willMoveToSuperview:回调
  4. didMoveToWindow:回调和didMoveToSuperview:相似,从命名上能看出其区别。
  5. willMoveToWindow:在视图移动前发出的回调。
  6. willRemoveToSubview:回调通知父视图子视图即将被删除

ASDK渲染过程

主要流程简介

ASDK的渲染过程主要分为4条主线

  1. 初始化ASDisplayNode对应的UIView或者CALayer
  2. 在当前视图进入视图层级时,执行setDisplay方法
  3. display方法执行时,想后台线程分发绘制事物
  4. 注册主线层RunLoop的观察者,在每个RunLoop结束时回调

初始化ASDisplayNode对应的UIView或者CALayer

在当前视图进入视图层级时,执行setDisplay方法

display方法执行时,想后台线程分发绘制事物

派发异步绘制任务(_ASDisplayLayer)

1
2
3
4
5
6
7
8
9
10
11
- (void)display
{
ASDisplayNodeAssertMainThread();
[self _hackResetNeedsDisplay];

if (self.displaySuspended) {
return;
}

[self display:self.displaysAsynchronously];
}
1
2
3
4
5
6
7
8
9

- (void)display:(BOOL)asynchronously
{
if (CGRectIsEmpty(self.bounds)) {
_attemptedDisplayWhileZeroSized = YES;
}

[self.asyncDelegate displayAsyncLayer:self asynchronously:asynchronously];
}

主要是通过delegate的代理了派发流程
派发流程(ASDisplayNode + AsyncDisplay)

1
2
3
4
5
6
7
8
9
10
11
12
13
14
15
16
17
18
19
20
21
22
23
24
25
26
27
28
29
30
31
32
33
34
35
36
37
38
39
40
41
42
43
44
45
46
47
48
49
50
51
52
53
54
55
56
57
58
59
60
61
62
63
64
65
66
- (void)displayAsyncLayer:(_ASDisplayLayer *)asyncLayer asynchronously:(BOOL)asynchronously
{

CALayer *layer = _layer;
BOOL rasterizesSubtree = _flags.rasterizesSubtree;

__instanceLock__.unlock();


asyncdisplaykit_async_transaction_operation_block_t displayBlock = [self _displayBlockWithAsynchronous:asynchronously isCancelledBlock:isCancelledBlock rasterizing:NO];

if (!displayBlock) {
return;
}


asyncdisplaykit_async_transaction_operation_completion_block_t completionBlock = ^(id<NSObject> value, BOOL canceled){
ASDisplayNodeCAssertMainThread();
if (!canceled && !isCancelledBlock()) {
UIImage *image = (UIImage *)value;
BOOL stretchable = (NO == UIEdgeInsetsEqualToEdgeInsets(image.capInsets, UIEdgeInsetsZero));
if (stretchable) {
ASDisplayNodeSetResizableContents(layer, image);
} else {
layer.contentsScale = self.contentsScale;
layer.contents = (id)image.CGImage;
}
[self didDisplayAsyncLayer:self.asyncLayer];

if (rasterizesSubtree) {
ASDisplayNodePerformBlockOnEverySubnode(self, NO, ^(ASDisplayNode * _Nonnull node) {
[node didDisplayAsyncLayer:node.asyncLayer];
});
}
}
};

// Call willDisplay immediately in either case
[self willDisplayAsyncLayer:self.asyncLayer asynchronously:asynchronously];

if (rasterizesSubtree) {
ASDisplayNodePerformBlockOnEverySubnode(self, NO, ^(ASDisplayNode * _Nonnull node) {
[node willDisplayAsyncLayer:node.asyncLayer asynchronously:asynchronously];
});
}

if (asynchronously) {
// Async rendering operations are contained by a transaction, which allows them to proceed and concurrently
// while synchronizing the final application of the results to the layer's contents property (completionBlock).

// First, look to see if we are expected to join a parent's transaction container.
CALayer *containerLayer = layer.asyncdisplaykit_parentTransactionContainer ? : layer;

// In the case that a transaction does not yet exist (such as for an individual node outside of a container),
// this call will allocate the transaction and add it to _ASAsyncTransactionGroup.
// It will automatically commit the transaction at the end of the runloop.
_ASAsyncTransaction *transaction = containerLayer.asyncdisplaykit_asyncTransaction;

// Adding this displayBlock operation to the transaction will start it IMMEDIATELY.
// The only function of the transaction commit is to gate the calling of the completionBlock.
[transaction addOperationWithBlock:displayBlock priority:self.drawingPriority queue:[_ASDisplayLayer displayQueue] completion:completionBlock];
} else {
UIImage *contents = (UIImage *)displayBlock();
completionBlock(contents, NO);
}
}

代码比较长,但逻辑比较简单,主要做了三件事情:

  1. 创建displayBlock,真正逻辑的渲染都在这里
  2. 创建completionBlock,completionBlock会在主线程执行,负责将渲染完成的内存显示到屏幕
  3. 将以上两个block添加到_ASAsyncTransaction

到这里分发的过程就算完成了,以上只是将block添加到了transaction,那block的执行时机是什么时候呢?

注册主线层RunLoop的观察者,在每个RunLoop结束时回调

上一节中提到的两个block的执行时机,是通过注册主线层RunLoop的观察者来确定的。

_ASAsyncTransaction

1
2
3
4
5
6
7
8
9
10
11
12
13
14
15
16
17
18
19
20
21
+ (void)registerTransactionGroupAsMainRunloopObserver:(_ASAsyncTransactionGroup *)transactionGroup
{
ASDisplayNodeAssertMainThread();
static CFRunLoopObserverRef observer;
ASDisplayNodeAssert(observer == NULL, @"A _ASAsyncTransactionGroup should not be registered on the main runloop twice");
// defer the commit of the transaction so we can add more during the current runloop iteration
CFRunLoopRef runLoop = CFRunLoopGetCurrent();
CFOptionFlags activities = (kCFRunLoopBeforeWaiting | // before the run loop starts sleeping
kCFRunLoopExit); // before exiting a runloop run

observer = CFRunLoopObserverCreateWithHandler(NULL, // allocator
activities, // activities
YES, // repeats
INT_MAX, // order after CA transaction commits
^(CFRunLoopObserverRef observer, CFRunLoopActivity activity) {
ASDisplayNodeCAssertMainThread();
[transactionGroup commit];
});
CFRunLoopAddObserver(runLoop, observer, kCFRunLoopCommonModes);
CFRelease(observer);
}

上述代码会在RunLoop即将退出或进入休眠时,执行transactionGroupcommit方法。也就是每次RunLoop结束时开始绘制内容

_ASAsyncTransactionGroup

1
2
3
4
5
6
7
8
9
10
11
12
13
14
15
16
17
- (void)commit
{
ASDisplayNodeAssertMainThread();

if ([_containers count]) {
NSHashTable *containersToCommit = _containers;
_containers = [NSHashTable hashTableWithOptions:NSHashTableObjectPointerPersonality];

for (id<ASAsyncTransactionContainer> container in containersToCommit) {
// Note that the act of committing a transaction may open a new transaction,
// so we must nil out the transaction we're committing first.
_ASAsyncTransaction *transaction = container.asyncdisplaykit_currentAsyncTransaction;
container.asyncdisplaykit_currentAsyncTransaction = nil;
[transaction commit];
}
}
}

ASAsyncTransactionOperation

1
2
3
4
5
6
7
8
9
10
11
12
13
14
15
16
17
18
19
- (void)commit
{
ASAsyncTransactionAssertMainThread();
NSAssert(self.state == ASAsyncTransactionStateOpen, @"You cannot double-commit a transaction");
self.state = ASAsyncTransactionStateCommitted;

if ([_operations count] == 0) {
// Fast path: if a transaction was opened, but no operations were added, execute completion block synchronously.
if (_completionBlock) {
_completionBlock(self, NO);
}
} else {
NSAssert(_group != NULL, @"If there are operations, dispatch group should have been created");

_group->notify(dispatch_get_main_queue(), ^{
[self completeTransaction];
});
}
}
1
2
3
4
5
6
7
8
9
10
11
12
13
14
15
16
17
18
19
20
- (void)completeTransaction
{
ASAsyncTransactionAssertMainThread();
ASAsyncTransactionState state = self.state;
if (state != ASAsyncTransactionStateComplete) {
BOOL isCanceled = (state == ASAsyncTransactionStateCanceled);
for (ASAsyncTransactionOperation *operation in _operations) {
[operation callAndReleaseCompletionBlock:isCanceled];
}

// Always set state to Complete, even if we were cancelled, to block any extraneous
// calls to this method that may have been scheduled for the next runloop
// (e.g. if we needed to force one in this runloop with -waitUntilComplete, but another was already scheduled)
self.state = ASAsyncTransactionStateComplete;

if (_completionBlock) {
_completionBlock(self, isCanceled);
}
}
}

上述代码描述了commit流程,目前只看到了上一节中提到的completionBlock在主线程被执行,displayBlock又是什么时候被执行的呢?这就得看ASAsyncTransactionQueue

ASAsyncTransactionQueue 绘制事物队列

ASAsyncTransactionQueue 是后台绘制线程与主线层之间通信的桥梁,负责将后台绘制完成的内容,通知给主线层显示。其实是一个生产-消费者的设计模式,这里有两条生产线:

  1. 第一条生产线是上一节中提到的display方法中,不停地生产 displayBlock
  2. 第二条生产线是,主线层RunLoop的观察者不停地生产 GroupNotifyGroupNotify其实是对completionBlock的封装

具体消费流程:

  1. 视图进入视图层时,也就是_ASDisplayViewwillMoveToWindow被调用时,对应的CALayer执行setDisplay方法

  2. 对应的CALayer的display执行,向后台线程分发绘制事物,将上一节提到两个block添加到_ASAsyncTransaction,并间接调用ASAsyncTransactionQueueschedule方法

  3. schedule方法将displayBlock压入堆栈,然后将displayBlock出栈并执行,执行displayBlock后调用leave方法。这里为什么要用堆栈呢,主要为了保证最后进入视图层的View,最早被绘制。

  4. leave方法会取出第二条生产先产生的notify并执行,也就是在主线程中显示绘制完成的内容。

可以看出,ASDK确实将许多昂贵的操作移出了主线程,有效地加快了视图的绘制与渲染,保证了主线程的流畅性

ASDK是如何提高绘制效率的

在上一节中,我们了解到了ASDK的渲染流程,主要是通过将displayBlock中的绘制放到后台线程,加快了视图的绘制与渲染,保证了主线程的流畅性。那ASDK又是如何提高绘制效率的呢?
先看一下displayBlock的创建

1
2
3
4
5
6
7
8
9
10
11
12
13
14
15
16
17
18
19
20
21
22
23
24
25
26
27
28
29
30
31
32
33
34
35
36
37
38
39
40
41
42
43
44
45
46
47
48
49
50
51
52
53
54
55
56
57
58
59
60
61
62
63
64
65
66
67
68
69
- (asyncdisplaykit_async_transaction_operation_block_t)_displayBlockWithAsynchronous:(BOOL)asynchronous
isCancelledBlock:(asdisplaynode_iscancelled_block_t)isCancelledBlock
rasterizing:(BOOL)rasterizing
{
ASDisplayNodeAssertMainThread();

if (shouldBeginRasterizing) {
// Collect displayBlocks for all descendants.
NSMutableArray *displayBlocks = [NSMutableArray array];
[self _recursivelyRasterizeSelfAndSublayersWithIsCancelledBlock:isCancelledBlock displayBlocks:displayBlocks];
CHECK_CANCELLED_AND_RETURN_NIL();

// If [UIColor clearColor] or another semitransparent background color is used, include alpha channel when rasterizing.
// Unlike CALayer drawing, we include the backgroundColor as a base during rasterization.
opaque = opaque && CGColorGetAlpha(backgroundColor.CGColor) == 1.0f;

displayBlock = ^id{
CHECK_CANCELLED_AND_RETURN_NIL();

UIGraphicsBeginImageContextWithOptions(bounds.size, opaque, contentsScaleForDisplay);

for (dispatch_block_t block in displayBlocks) {
CHECK_CANCELLED_AND_RETURN_NIL(UIGraphicsEndImageContext());
block();
}

UIImage *image = UIGraphicsGetImageFromCurrentImageContext();
UIGraphicsEndImageContext();

ASDN_DELAY_FOR_DISPLAY();
return image;
};
} else {
displayBlock = ^id{
CHECK_CANCELLED_AND_RETURN_NIL();

if (shouldCreateGraphicsContext) {
UIGraphicsBeginImageContextWithOptions(bounds.size, opaque, contentsScaleForDisplay);
CHECK_CANCELLED_AND_RETURN_NIL( UIGraphicsEndImageContext(); );
}

CGContextRef currentContext = UIGraphicsGetCurrentContext();
UIImage *image = nil;

// For -display methods, we don't have a context, and thus will not call the _willDisplayNodeContentWithRenderingContext or
// _didDisplayNodeContentWithRenderingContext blocks. It's up to the implementation of -display... to do what it needs.
[self __willDisplayNodeContentWithRenderingContext:currentContext drawParameters:drawParameters];

if (usesImageDisplay) { // If we are using a display method, we'll get an image back directly.
image = [self.class displayWithParameters:drawParameters isCancelled:isCancelledBlock];
} else if (usesDrawRect) { // If we're using a draw method, this will operate on the currentContext.
[self.class drawRect:bounds withParameters:drawParameters isCancelled:isCancelledBlock isRasterizing:rasterizing];
}

[self __didDisplayNodeContentWithRenderingContext:currentContext image:&image drawParameters:drawParameters backgroundColor:backgroundColor borderWidth:borderWidth borderColor:borderColor];

if (shouldCreateGraphicsContext) {
CHECK_CANCELLED_AND_RETURN_NIL( UIGraphicsEndImageContext(); );
image = UIGraphicsGetImageFromCurrentImageContext();
UIGraphicsEndImageContext();
}

ASDN_DELAY_FOR_DISPLAY();
return image;
};
}

return displayBlock;
}

可看到ASDK根据shouldBeginRasterizingdisplayBlock指向了不同的block。

栅格化

shouldBeginRasterizing是栅格化的一个属性,当它为true时,ASDK会将子视图递归的绘制在父视图上。

1
2
3
4
5
6
7
8
9
10
11
12
13
14
15
16
17
18
19
20
21
22
23
24
25
26
27
if (shouldBeginRasterizing) {
// Collect displayBlocks for all descendants.
NSMutableArray *displayBlocks = [NSMutableArray array];
[self _recursivelyRasterizeSelfAndSublayersWithIsCancelledBlock:isCancelledBlock displayBlocks:displayBlocks];
CHECK_CANCELLED_AND_RETURN_NIL();

// If [UIColor clearColor] or another semitransparent background color is used, include alpha channel when rasterizing.
// Unlike CALayer drawing, we include the backgroundColor as a base during rasterization.
opaque = opaque && CGColorGetAlpha(backgroundColor.CGColor) == 1.0f;

displayBlock = ^id{
CHECK_CANCELLED_AND_RETURN_NIL();

UIGraphicsBeginImageContextWithOptions(bounds.size, opaque, contentsScaleForDisplay);

for (dispatch_block_t block in displayBlocks) {
CHECK_CANCELLED_AND_RETURN_NIL(UIGraphicsEndImageContext());
block();
}

UIImage *image = UIGraphicsGetImageFromCurrentImageContext();
UIGraphicsEndImageContext();

ASDN_DELAY_FOR_DISPLAY();
return image;
};
}

绘制图片

这种方式更多的适用于图片节点ASImageNode

1
2
3
4
5
6
7
8
9
10
11
12
13
14
15
16
17
18
19
20
21
22
23
24
- (asyncdisplaykit_async_transaction_operation_block_t)_displayBlockWithAsynchronous:(BOOL)asynchronous isCancelledBlock:(asdisplaynode_iscancelled_block_t)isCancelledBlock rasterizing:(BOOL)rasterizing {
asyncdisplaykit_async_transaction_operation_block_t displayBlock = nil;
ASDisplayNodeFlags flags = _flags;

if (!rasterizing && self.shouldRasterizeDescendants) {
#:栅格化
} else if (flags.implementsInstanceImageDisplay || flags.implementsImageDisplay) {
id drawParameters = [self drawParameters];

displayBlock = ^id{
UIImage *result = nil;
if (flags.implementsInstanceImageDisplay) {
result = [self displayWithParameters:drawParameters isCancelled:isCancelledBlock];
} else {
result = [[self class] displayWithParameters:drawParameters isCancelled:isCancelledBlock];
}
return result;
};
} else if (flags.implementsInstanceDrawRect || flags.implementsDrawRect) {
#:提供 context,使用 CG 绘图
}

return [displayBlock copy];
}

使用GC绘制

文字的绘制一般都会在- drawRect:withParameters:isCancelled:isRasterizing:进行,这个方法只是提供了一个合适的用于绘制的上下文,该方法不止可以绘制文字,只是在这里绘制文字比较常见:

1
2
3
4
5
6
7
8
9
10
11
12
13
14
15
16
17
18
19
20
21
22
23
24
25
26
27
28
- (asyncdisplaykit_async_transaction_operation_block_t)_displayBlockWithAsynchronous:(BOOL)asynchronous isCancelledBlock:(asdisplaynode_iscancelled_block_t)isCancelledBlock rasterizing:(BOOL)rasterizing {
asyncdisplaykit_async_transaction_operation_block_t displayBlock = nil;
ASDisplayNodeFlags flags = _flags;

if (!rasterizing && self.shouldRasterizeDescendants) {
#:栅格化
} else if (flags.implementsInstanceImageDisplay || flags.implementsImageDisplay) {
#:绘制 UIImage
} else if (flags.implementsInstanceDrawRect || flags.implementsDrawRect) {
if (!rasterizing) {
UIGraphicsBeginImageContextWithOptions(bounds.size, opaque, contentsScaleForDisplay);
}

if (flags.implementsInstanceDrawRect) {
[self drawRect:bounds withParameters:drawParameters isCancelled:isCancelledBlock isRasterizing:rasterizing];
} else {
[[self class] drawRect:bounds withParameters:drawParameters isCancelled:isCancelledBlock isRasterizing:rasterizing];
}

UIImage *image = nil;
if (!rasterizing) {
image = UIGraphicsGetImageFromCurrentImageContext();
UIGraphicsEndImageContext();
}

return image;
};
}

ASNetworkImageNode

使用方法

一般的使用方法,初始化并设置一个图片URL就可以了

1
2
ASNetworkImageNode *imageNode = [[ASNetworkImageNode alloc] init];
imageNode.URL = [NSURL URLWithString:@"https://someurl.com/image_uri"];

ASNetworkImageNode的setURL方法最终调用的其实是- (void)setURLs: resetToDefault:方法

- (void)setURLs: resetToDefault:

1
2
3
4
- (void)setURLs:(NSArray <NSURL *> *)URLs resetToDefault:(BOOL)reset{
[self _locked_cancelImageDownloadWithResumePossibility:NO];
[self setNeedsPreload];
}

做了两件事情:

  1. 取消上一张图片的下载,取消下载就是通过调用_downloadercancelImageDownloadForIdentifier方法来取消
  1. 预加载图片,预加载则是将创建_downloader的任务封装block扔到队列里,让异步线程去执行。

渲染过程

ASNetworkImageNode调用链

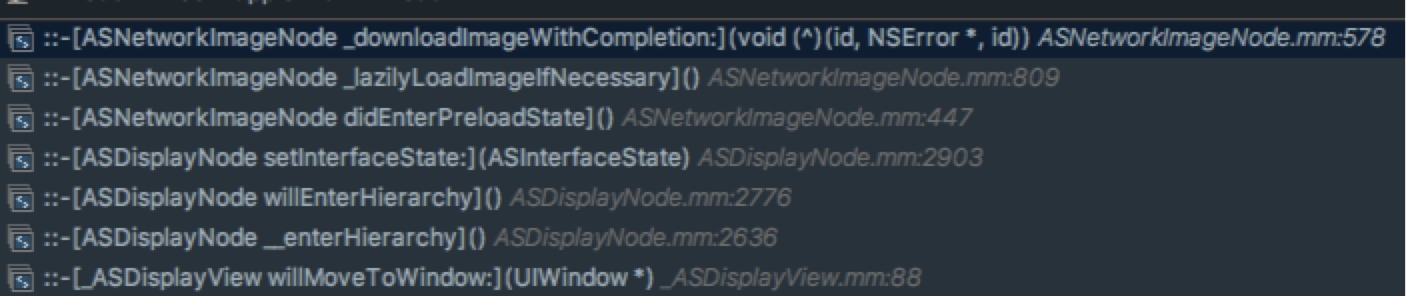
可以看到ASNetworkImageNode在willMoveToWindow方法中,间接调用到了_downloadImageWithCompletion方法,该方法实际上是将下载图片的block抛给异步线程处理。

1
2
3
4
5
6
7
8
9
10
11
12
13
14
15
- (void)_downloadImageWithCompletion:(void (^)(id <ASImageContainerProtocol> imageContainer, NSError*, id downloadIdentifier))finished
{
ASPerformBlockOnBackgroundThread(^{
//下载网络图片
_downloadIdentifier = [_downloader downloadImageWithURLs:urls
callbackQueue:dispatch_get_main_queue()
downloadProgress:NULL
completion:^(id <ASImageContainerProtocol> _Nullable imageContainer, NSError * _Nullable error, id _Nullable downloadIdentifier) {
if (finished != NULL) {
finished(imageContainer, error, downloadIdentifier);
}
}];
});

}
1
2
3
4
5
6
7
8
9
10
11
void ASPerformBlockOnBackgroundThread(void (^block)(void))
{
if (block == nil){
return;
}
if (ASDisplayNodeThreadIsMain()) {
dispatch_async(dispatch_get_global_queue(DISPATCH_QUEUE_PRIORITY_DEFAULT, 0), block);
} else {
block();
}
}

那么ASNetworkImageView的图片加载逻辑是:

视图进入视图层(willMoveToWindow)-> 将下载图片封装成任务丢给异步线程(_downloadImageWithCompletion)-> 异步下载完成后,将图片渲染到屏幕,也就是在传给-downloadImageWithURLs: callbackQueue: downloadProgress: completion:; 方法的completion block中将图片设置到ASNetworkImageView的

这个completionblock是在 - (void)_lazilyLoadImageIfNecessary方法中创建并传给_downloadImageWithCompletion

completionblock代码

1
2
3
4
5
6
7
8
9
10
11
12
13
auto finished = ^(id <ASImageContainerProtocol>imageContainer, NSError *error, id downloadIdentifier, ASNetworkImageSource imageSource) {
if (imageContainer != nil) {
[strongSelf _locked_setCurrentImageQuality:1.0];
if ([imageContainer asdk_animatedImageData] && strongSelf->_downloaderFlags.downloaderImplementsAnimatedImage) {
id animatedImage = [strongSelf->_downloader animatedImageWithData:[imageContainer asdk_animatedImageData]];
[strongSelf _locked_setAnimatedImage:animatedImage];
} else {
[strongSelf _locked__setImage:[imageContainer asdk_image]];
}
strongSelf->_imageLoaded = YES;
}

}

事实上在_locked__setImage:方法中又会调用setNeedsDisplay方法,从而触发上一节讲到的异步渲染逻辑。

使用过程中存在的坑

通过前面两个小节可以发现,_downloader的创建以及cancel其实是在不同的线程里执行的。那么就有可能存在cancelImageDownloadForIdentifier会在_downloader创建之前执行,从而导致加载失效URL的情况,在页面快速滚动的时候会造成UIView的闪烁,以及产生性能问题,造成卡顿。