Mochangxing


  • Home

  • Archives

ASDK渲染原理

Posted on 2018-03-10

基础知识

RunLoop

UIView的生命周期

某个视图的层次一改变,该视图就会收到一次回调。

  1. 调用addSubivew:成功后会给该视图发送didAddSubivew:回调,触发UIView的子类在心增视图时执行其他操作。
  2. didMoveToSuperview:会通知相关视图他们的上级视图已经变化。添加和移除都会调用,所以要判断 superView在不在
  3. 视图移动前会发出willMoveToSuperview:回调
  4. didMoveToWindow:回调和didMoveToSuperview:相似,从命名上能看出其区别。
  5. willMoveToWindow:在视图移动前发出的回调。
  6. willRemoveToSubview:回调通知父视图子视图即将被删除

ASDK渲染过程

主要流程简介

ASDK的渲染过程主要分为4条主线

  1. 初始化ASDisplayNode对应的UIView或者CALayer
  2. 在当前视图进入视图层级时,执行setDisplay方法
  3. display方法执行时,想后台线程分发绘制事物
  4. 注册主线层RunLoop的观察者,在每个RunLoop结束时回调

初始化ASDisplayNode对应的UIView或者CALayer

在当前视图进入视图层级时,执行setDisplay方法

display方法执行时,想后台线程分发绘制事物

派发异步绘制任务(_ASDisplayLayer)

1
2
3
4
5
6
7
8
9
10
11
- (void)display
{
ASDisplayNodeAssertMainThread();
[self _hackResetNeedsDisplay];

if (self.displaySuspended) {
return;
}

[self display:self.displaysAsynchronously];
}
1
2
3
4
5
6
7
8
9

- (void)display:(BOOL)asynchronously
{
if (CGRectIsEmpty(self.bounds)) {
_attemptedDisplayWhileZeroSized = YES;
}

[self.asyncDelegate displayAsyncLayer:self asynchronously:asynchronously];
}

主要是通过delegate的代理了派发流程
派发流程(ASDisplayNode + AsyncDisplay)

1
2
3
4
5
6
7
8
9
10
11
12
13
14
15
16
17
18
19
20
21
22
23
24
25
26
27
28
29
30
31
32
33
34
35
36
37
38
39
40
41
42
43
44
45
46
47
48
49
50
51
52
53
54
55
56
57
58
59
60
61
62
63
64
65
66
- (void)displayAsyncLayer:(_ASDisplayLayer *)asyncLayer asynchronously:(BOOL)asynchronously
{

CALayer *layer = _layer;
BOOL rasterizesSubtree = _flags.rasterizesSubtree;

__instanceLock__.unlock();


asyncdisplaykit_async_transaction_operation_block_t displayBlock = [self _displayBlockWithAsynchronous:asynchronously isCancelledBlock:isCancelledBlock rasterizing:NO];

if (!displayBlock) {
return;
}


asyncdisplaykit_async_transaction_operation_completion_block_t completionBlock = ^(id<NSObject> value, BOOL canceled){
ASDisplayNodeCAssertMainThread();
if (!canceled && !isCancelledBlock()) {
UIImage *image = (UIImage *)value;
BOOL stretchable = (NO == UIEdgeInsetsEqualToEdgeInsets(image.capInsets, UIEdgeInsetsZero));
if (stretchable) {
ASDisplayNodeSetResizableContents(layer, image);
} else {
layer.contentsScale = self.contentsScale;
layer.contents = (id)image.CGImage;
}
[self didDisplayAsyncLayer:self.asyncLayer];

if (rasterizesSubtree) {
ASDisplayNodePerformBlockOnEverySubnode(self, NO, ^(ASDisplayNode * _Nonnull node) {
[node didDisplayAsyncLayer:node.asyncLayer];
});
}
}
};

// Call willDisplay immediately in either case
[self willDisplayAsyncLayer:self.asyncLayer asynchronously:asynchronously];

if (rasterizesSubtree) {
ASDisplayNodePerformBlockOnEverySubnode(self, NO, ^(ASDisplayNode * _Nonnull node) {
[node willDisplayAsyncLayer:node.asyncLayer asynchronously:asynchronously];
});
}

if (asynchronously) {
// Async rendering operations are contained by a transaction, which allows them to proceed and concurrently
// while synchronizing the final application of the results to the layer's contents property (completionBlock).

// First, look to see if we are expected to join a parent's transaction container.
CALayer *containerLayer = layer.asyncdisplaykit_parentTransactionContainer ? : layer;

// In the case that a transaction does not yet exist (such as for an individual node outside of a container),
// this call will allocate the transaction and add it to _ASAsyncTransactionGroup.
// It will automatically commit the transaction at the end of the runloop.
_ASAsyncTransaction *transaction = containerLayer.asyncdisplaykit_asyncTransaction;

// Adding this displayBlock operation to the transaction will start it IMMEDIATELY.
// The only function of the transaction commit is to gate the calling of the completionBlock.
[transaction addOperationWithBlock:displayBlock priority:self.drawingPriority queue:[_ASDisplayLayer displayQueue] completion:completionBlock];
} else {
UIImage *contents = (UIImage *)displayBlock();
completionBlock(contents, NO);
}
}

代码比较长,但逻辑比较简单,主要做了三件事情:

  1. 创建displayBlock,真正逻辑的渲染都在这里
  2. 创建completionBlock,completionBlock会在主线程执行,负责将渲染完成的内存显示到屏幕
  3. 将以上两个block添加到_ASAsyncTransaction

到这里分发的过程就算完成了,以上只是将block添加到了transaction,那block的执行时机是什么时候呢?

注册主线层RunLoop的观察者,在每个RunLoop结束时回调

上一节中提到的两个block的执行时机,是通过注册主线层RunLoop的观察者来确定的。

_ASAsyncTransaction

1
2
3
4
5
6
7
8
9
10
11
12
13
14
15
16
17
18
19
20
21
+ (void)registerTransactionGroupAsMainRunloopObserver:(_ASAsyncTransactionGroup *)transactionGroup
{
ASDisplayNodeAssertMainThread();
static CFRunLoopObserverRef observer;
ASDisplayNodeAssert(observer == NULL, @"A _ASAsyncTransactionGroup should not be registered on the main runloop twice");
// defer the commit of the transaction so we can add more during the current runloop iteration
CFRunLoopRef runLoop = CFRunLoopGetCurrent();
CFOptionFlags activities = (kCFRunLoopBeforeWaiting | // before the run loop starts sleeping
kCFRunLoopExit); // before exiting a runloop run

observer = CFRunLoopObserverCreateWithHandler(NULL, // allocator
activities, // activities
YES, // repeats
INT_MAX, // order after CA transaction commits
^(CFRunLoopObserverRef observer, CFRunLoopActivity activity) {
ASDisplayNodeCAssertMainThread();
[transactionGroup commit];
});
CFRunLoopAddObserver(runLoop, observer, kCFRunLoopCommonModes);
CFRelease(observer);
}

上述代码会在RunLoop即将退出或进入休眠时,执行transactionGroup的commit方法。也就是每次RunLoop结束时开始绘制内容

_ASAsyncTransactionGroup

1
2
3
4
5
6
7
8
9
10
11
12
13
14
15
16
17
- (void)commit
{
ASDisplayNodeAssertMainThread();

if ([_containers count]) {
NSHashTable *containersToCommit = _containers;
_containers = [NSHashTable hashTableWithOptions:NSHashTableObjectPointerPersonality];

for (id<ASAsyncTransactionContainer> container in containersToCommit) {
// Note that the act of committing a transaction may open a new transaction,
// so we must nil out the transaction we're committing first.
_ASAsyncTransaction *transaction = container.asyncdisplaykit_currentAsyncTransaction;
container.asyncdisplaykit_currentAsyncTransaction = nil;
[transaction commit];
}
}
}

ASAsyncTransactionOperation

1
2
3
4
5
6
7
8
9
10
11
12
13
14
15
16
17
18
19
- (void)commit
{
ASAsyncTransactionAssertMainThread();
NSAssert(self.state == ASAsyncTransactionStateOpen, @"You cannot double-commit a transaction");
self.state = ASAsyncTransactionStateCommitted;

if ([_operations count] == 0) {
// Fast path: if a transaction was opened, but no operations were added, execute completion block synchronously.
if (_completionBlock) {
_completionBlock(self, NO);
}
} else {
NSAssert(_group != NULL, @"If there are operations, dispatch group should have been created");

_group->notify(dispatch_get_main_queue(), ^{
[self completeTransaction];
});
}
}
1
2
3
4
5
6
7
8
9
10
11
12
13
14
15
16
17
18
19
20
- (void)completeTransaction
{
ASAsyncTransactionAssertMainThread();
ASAsyncTransactionState state = self.state;
if (state != ASAsyncTransactionStateComplete) {
BOOL isCanceled = (state == ASAsyncTransactionStateCanceled);
for (ASAsyncTransactionOperation *operation in _operations) {
[operation callAndReleaseCompletionBlock:isCanceled];
}

// Always set state to Complete, even if we were cancelled, to block any extraneous
// calls to this method that may have been scheduled for the next runloop
// (e.g. if we needed to force one in this runloop with -waitUntilComplete, but another was already scheduled)
self.state = ASAsyncTransactionStateComplete;

if (_completionBlock) {
_completionBlock(self, isCanceled);
}
}
}

上述代码描述了commit流程,目前只看到了上一节中提到的completionBlock在主线程被执行,displayBlock又是什么时候被执行的呢?这就得看ASAsyncTransactionQueue了

ASAsyncTransactionQueue 绘制事物队列

ASAsyncTransactionQueue 是后台绘制线程与主线层之间通信的桥梁,负责将后台绘制完成的内容,通知给主线层显示。其实是一个生产-消费者的设计模式,这里有两条生产线:

  1. 第一条生产线是上一节中提到的display方法中,不停地生产 displayBlock
  2. 第二条生产线是,主线层RunLoop的观察者不停地生产 GroupNotify,GroupNotify其实是对completionBlock的封装

具体消费流程:

  1. 视图进入视图层时,也就是_ASDisplayView的willMoveToWindow被调用时,对应的CALayer执行setDisplay方法

  2. 对应的CALayer的display执行,向后台线程分发绘制事物,将上一节提到两个block添加到_ASAsyncTransaction,并间接调用ASAsyncTransactionQueue的schedule方法

  3. schedule方法将displayBlock压入堆栈,然后将displayBlock出栈并执行,执行displayBlock后调用leave方法。这里为什么要用堆栈呢,主要为了保证最后进入视图层的View,最早被绘制。

  4. leave方法会取出第二条生产先产生的notify并执行,也就是在主线程中显示绘制完成的内容。

可以看出,ASDK确实将许多昂贵的操作移出了主线程,有效地加快了视图的绘制与渲染,保证了主线程的流畅性

ASDK是如何提高绘制效率的

在上一节中,我们了解到了ASDK的渲染流程,主要是通过将displayBlock中的绘制放到后台线程,加快了视图的绘制与渲染,保证了主线程的流畅性。那ASDK又是如何提高绘制效率的呢?
先看一下displayBlock的创建

1
2
3
4
5
6
7
8
9
10
11
12
13
14
15
16
17
18
19
20
21
22
23
24
25
26
27
28
29
30
31
32
33
34
35
36
37
38
39
40
41
42
43
44
45
46
47
48
49
50
51
52
53
54
55
56
57
58
59
60
61
62
63
64
65
66
67
68
69
- (asyncdisplaykit_async_transaction_operation_block_t)_displayBlockWithAsynchronous:(BOOL)asynchronous
isCancelledBlock:(asdisplaynode_iscancelled_block_t)isCancelledBlock
rasterizing:(BOOL)rasterizing
{
ASDisplayNodeAssertMainThread();

if (shouldBeginRasterizing) {
// Collect displayBlocks for all descendants.
NSMutableArray *displayBlocks = [NSMutableArray array];
[self _recursivelyRasterizeSelfAndSublayersWithIsCancelledBlock:isCancelledBlock displayBlocks:displayBlocks];
CHECK_CANCELLED_AND_RETURN_NIL();

// If [UIColor clearColor] or another semitransparent background color is used, include alpha channel when rasterizing.
// Unlike CALayer drawing, we include the backgroundColor as a base during rasterization.
opaque = opaque && CGColorGetAlpha(backgroundColor.CGColor) == 1.0f;

displayBlock = ^id{
CHECK_CANCELLED_AND_RETURN_NIL();

UIGraphicsBeginImageContextWithOptions(bounds.size, opaque, contentsScaleForDisplay);

for (dispatch_block_t block in displayBlocks) {
CHECK_CANCELLED_AND_RETURN_NIL(UIGraphicsEndImageContext());
block();
}

UIImage *image = UIGraphicsGetImageFromCurrentImageContext();
UIGraphicsEndImageContext();

ASDN_DELAY_FOR_DISPLAY();
return image;
};
} else {
displayBlock = ^id{
CHECK_CANCELLED_AND_RETURN_NIL();

if (shouldCreateGraphicsContext) {
UIGraphicsBeginImageContextWithOptions(bounds.size, opaque, contentsScaleForDisplay);
CHECK_CANCELLED_AND_RETURN_NIL( UIGraphicsEndImageContext(); );
}

CGContextRef currentContext = UIGraphicsGetCurrentContext();
UIImage *image = nil;

// For -display methods, we don't have a context, and thus will not call the _willDisplayNodeContentWithRenderingContext or
// _didDisplayNodeContentWithRenderingContext blocks. It's up to the implementation of -display... to do what it needs.
[self __willDisplayNodeContentWithRenderingContext:currentContext drawParameters:drawParameters];

if (usesImageDisplay) { // If we are using a display method, we'll get an image back directly.
image = [self.class displayWithParameters:drawParameters isCancelled:isCancelledBlock];
} else if (usesDrawRect) { // If we're using a draw method, this will operate on the currentContext.
[self.class drawRect:bounds withParameters:drawParameters isCancelled:isCancelledBlock isRasterizing:rasterizing];
}

[self __didDisplayNodeContentWithRenderingContext:currentContext image:&image drawParameters:drawParameters backgroundColor:backgroundColor borderWidth:borderWidth borderColor:borderColor];

if (shouldCreateGraphicsContext) {
CHECK_CANCELLED_AND_RETURN_NIL( UIGraphicsEndImageContext(); );
image = UIGraphicsGetImageFromCurrentImageContext();
UIGraphicsEndImageContext();
}

ASDN_DELAY_FOR_DISPLAY();
return image;
};
}

return displayBlock;
}

可看到ASDK根据shouldBeginRasterizing将displayBlock指向了不同的block。

栅格化

shouldBeginRasterizing是栅格化的一个属性,当它为true时,ASDK会将子视图递归的绘制在父视图上。

1
2
3
4
5
6
7
8
9
10
11
12
13
14
15
16
17
18
19
20
21
22
23
24
25
26
27
if (shouldBeginRasterizing) {
// Collect displayBlocks for all descendants.
NSMutableArray *displayBlocks = [NSMutableArray array];
[self _recursivelyRasterizeSelfAndSublayersWithIsCancelledBlock:isCancelledBlock displayBlocks:displayBlocks];
CHECK_CANCELLED_AND_RETURN_NIL();

// If [UIColor clearColor] or another semitransparent background color is used, include alpha channel when rasterizing.
// Unlike CALayer drawing, we include the backgroundColor as a base during rasterization.
opaque = opaque && CGColorGetAlpha(backgroundColor.CGColor) == 1.0f;

displayBlock = ^id{
CHECK_CANCELLED_AND_RETURN_NIL();

UIGraphicsBeginImageContextWithOptions(bounds.size, opaque, contentsScaleForDisplay);

for (dispatch_block_t block in displayBlocks) {
CHECK_CANCELLED_AND_RETURN_NIL(UIGraphicsEndImageContext());
block();
}

UIImage *image = UIGraphicsGetImageFromCurrentImageContext();
UIGraphicsEndImageContext();

ASDN_DELAY_FOR_DISPLAY();
return image;
};
}

绘制图片

这种方式更多的适用于图片节点ASImageNode

1
2
3
4
5
6
7
8
9
10
11
12
13
14
15
16
17
18
19
20
21
22
23
24
- (asyncdisplaykit_async_transaction_operation_block_t)_displayBlockWithAsynchronous:(BOOL)asynchronous isCancelledBlock:(asdisplaynode_iscancelled_block_t)isCancelledBlock rasterizing:(BOOL)rasterizing {
asyncdisplaykit_async_transaction_operation_block_t displayBlock = nil;
ASDisplayNodeFlags flags = _flags;

if (!rasterizing && self.shouldRasterizeDescendants) {
#:栅格化
} else if (flags.implementsInstanceImageDisplay || flags.implementsImageDisplay) {
id drawParameters = [self drawParameters];

displayBlock = ^id{
UIImage *result = nil;
if (flags.implementsInstanceImageDisplay) {
result = [self displayWithParameters:drawParameters isCancelled:isCancelledBlock];
} else {
result = [[self class] displayWithParameters:drawParameters isCancelled:isCancelledBlock];
}
return result;
};
} else if (flags.implementsInstanceDrawRect || flags.implementsDrawRect) {
#:提供 context,使用 CG 绘图
}

return [displayBlock copy];
}

使用GC绘制

文字的绘制一般都会在- drawRect:withParameters:isCancelled:isRasterizing:进行,这个方法只是提供了一个合适的用于绘制的上下文,该方法不止可以绘制文字,只是在这里绘制文字比较常见:

1
2
3
4
5
6
7
8
9
10
11
12
13
14
15
16
17
18
19
20
21
22
23
24
25
26
27
28
- (asyncdisplaykit_async_transaction_operation_block_t)_displayBlockWithAsynchronous:(BOOL)asynchronous isCancelledBlock:(asdisplaynode_iscancelled_block_t)isCancelledBlock rasterizing:(BOOL)rasterizing {
asyncdisplaykit_async_transaction_operation_block_t displayBlock = nil;
ASDisplayNodeFlags flags = _flags;

if (!rasterizing && self.shouldRasterizeDescendants) {
#:栅格化
} else if (flags.implementsInstanceImageDisplay || flags.implementsImageDisplay) {
#:绘制 UIImage
} else if (flags.implementsInstanceDrawRect || flags.implementsDrawRect) {
if (!rasterizing) {
UIGraphicsBeginImageContextWithOptions(bounds.size, opaque, contentsScaleForDisplay);
}

if (flags.implementsInstanceDrawRect) {
[self drawRect:bounds withParameters:drawParameters isCancelled:isCancelledBlock isRasterizing:rasterizing];
} else {
[[self class] drawRect:bounds withParameters:drawParameters isCancelled:isCancelledBlock isRasterizing:rasterizing];
}

UIImage *image = nil;
if (!rasterizing) {
image = UIGraphicsGetImageFromCurrentImageContext();
UIGraphicsEndImageContext();
}

return image;
};
}

ASNetworkImageNode

使用方法

一般的使用方法,初始化并设置一个图片URL就可以了

1
2
ASNetworkImageNode *imageNode = [[ASNetworkImageNode alloc] init];
imageNode.URL = [NSURL URLWithString:@"https://someurl.com/image_uri"];

ASNetworkImageNode的setURL方法最终调用的其实是- (void)setURLs: resetToDefault:方法

- (void)setURLs: resetToDefault:

1
2
3
4
- (void)setURLs:(NSArray <NSURL *> *)URLs resetToDefault:(BOOL)reset{
[self _locked_cancelImageDownloadWithResumePossibility:NO];
[self setNeedsPreload];
}

做了两件事情:

  1. 取消上一张图片的下载,取消下载就是通过调用_downloader 的cancelImageDownloadForIdentifier方法来取消
  1. 预加载图片,预加载则是将创建_downloader的任务封装block扔到队列里,让异步线程去执行。

渲染过程

ASNetworkImageNode调用链

可以看到ASNetworkImageNode在willMoveToWindow方法中,间接调用到了_downloadImageWithCompletion方法,该方法实际上是将下载图片的block抛给异步线程处理。

1
2
3
4
5
6
7
8
9
10
11
12
13
14
15
- (void)_downloadImageWithCompletion:(void (^)(id <ASImageContainerProtocol> imageContainer, NSError*, id downloadIdentifier))finished
{
ASPerformBlockOnBackgroundThread(^{
//下载网络图片
_downloadIdentifier = [_downloader downloadImageWithURLs:urls
callbackQueue:dispatch_get_main_queue()
downloadProgress:NULL
completion:^(id <ASImageContainerProtocol> _Nullable imageContainer, NSError * _Nullable error, id _Nullable downloadIdentifier) {
if (finished != NULL) {
finished(imageContainer, error, downloadIdentifier);
}
}];
});

}
1
2
3
4
5
6
7
8
9
10
11
void ASPerformBlockOnBackgroundThread(void (^block)(void))
{
if (block == nil){
return;
}
if (ASDisplayNodeThreadIsMain()) {
dispatch_async(dispatch_get_global_queue(DISPATCH_QUEUE_PRIORITY_DEFAULT, 0), block);
} else {
block();
}
}

那么ASNetworkImageView的图片加载逻辑是:

视图进入视图层(willMoveToWindow)-> 将下载图片封装成任务丢给异步线程(_downloadImageWithCompletion)-> 异步下载完成后,将图片渲染到屏幕,也就是在传给-downloadImageWithURLs: callbackQueue: downloadProgress: completion:; 方法的completion block中将图片设置到ASNetworkImageView的

这个completionblock是在 - (void)_lazilyLoadImageIfNecessary方法中创建并传给_downloadImageWithCompletion的

completionblock代码

1
2
3
4
5
6
7
8
9
10
11
12
13
auto finished = ^(id <ASImageContainerProtocol>imageContainer, NSError *error, id downloadIdentifier, ASNetworkImageSource imageSource) {
if (imageContainer != nil) {
[strongSelf _locked_setCurrentImageQuality:1.0];
if ([imageContainer asdk_animatedImageData] && strongSelf->_downloaderFlags.downloaderImplementsAnimatedImage) {
id animatedImage = [strongSelf->_downloader animatedImageWithData:[imageContainer asdk_animatedImageData]];
[strongSelf _locked_setAnimatedImage:animatedImage];
} else {
[strongSelf _locked__setImage:[imageContainer asdk_image]];
}
strongSelf->_imageLoaded = YES;
}

}

事实上在_locked__setImage:方法中又会调用setNeedsDisplay方法,从而触发上一节讲到的异步渲染逻辑。

使用过程中存在的坑

通过前面两个小节可以发现,_downloader的创建以及cancel其实是在不同的线程里执行的。那么就有可能存在cancelImageDownloadForIdentifier会在_downloader创建之前执行,从而导致加载失效URL的情况,在页面快速滚动的时候会造成UIView的闪烁,以及产生性能问题,造成卡顿。

Objective-C高级编程+iOS与OS+X多线程和内存管理 读书笔记之 block

Posted on 2018-01-27

block概要

概念:block是带有自动变量的匿名函数

block模式

1. 语法:

^ 返回值类型(可省略)`参数列表表达式`

1
2
3
^ int (int count) {
return count + 1
}

2. block类型变量

当函数参数与返回值使用block类型时,记述方式比较复杂,可以用 typedef 来解决

typedef int (^block_t)(int);
void func(block_t block)
block_t func()

3.自动截获变量

1
2
3
4
5
6
7
8
9
10
11
12
13
14
int main(int argc, const char * argv[]) {
@autoreleasepool {
// insert code here...

int a = 0;
void(^block)(void) = ^(){
NSLog(@"%d", a);
};
a = 1;
block();

}
return 0;
}

打印的出来的是 0

block表达式截获所使用的自动变量的值,即保存自动变量的瞬时值

4. __block修饰符

block只能截获自动变的瞬时值,但不能给自动变量赋值
使用__block修饰符的自动变量,可以在block表达式中被赋值 自动变量截获没有实现对C语言数组的截获, 使用时编译器会报错

block实现

编译前源码

1
2
3
4
5
6
7
8
9
10
11
12
int main(int argc, const char * argv[]) {
@autoreleasepool {
// insert code here...
int a = 0;
void(^block)(void) = ^(){
printf("%d", a);
};
a = 1;
block();
}
return 0;
}

编译后源码

1
2
3
4
5
6
7
8
9
10
11
12
13
14

int main(int argc, const char * argv[]) {

/* @autoreleasepool */ { __AtAutoreleasePool __autoreleasepool;


int a = 0;
void(*block)(void) = ((void (*)())&__main_block_impl_0((void *)__main_block_func_0, &__main_block_desc_0_DATA, a));
a = 1;
((void (*)(__block_impl *))((__block_impl *)block)->FuncPtr)((__block_impl *)block);

}
return 0;
}

先来看看 __main_block_func_0 的定义

1
2
3
4
5
6
static void __main_block_func_0(struct __main_block_impl_0 *__cself) {
// 我们的源码的编译后的函数体,值引用了变量 a
int a = __cself->a; // bound by copy

printf("%d", a);
}

那 main_block_impl_0 又是什么呢 ,看一下声明 main_block_impl_0是一个结构体,有三个成员

  1. struct block_impl impl // 结构体 block_impl 应该是block的本质
  2. struct __main_block_desc_0 Desc
  3. int a
1
2
3
4
5
6


struct __main_block_impl_0 {
struct __block_impl impl;
struct __main_block_desc_0* Desc;
int a;

再看看结构体 __block_impl 的定义,四个成员

  1. isa指针
  2. Flags
  3. Reserved
  4. 函数指针FuncPtr,函数指针指向源码编译后生成的函数,也就是__main_block_func_0
1
2
3
4
5
6
struct __block_impl {
void *isa;
int Flags;
int Reserved;
void *FuncPtr;
};

再回头看看__main_block_impl_0 的构造函数:

主要是 给block_impl赋值,以及截获自动变量。可以看到block_impl的isa指针被赋值为_NSConcreteStackBlock

1
2
3
4
5
6
7
  __main_block_impl_0(void *fp, struct __main_block_desc_0 *desc, int _a, int flags=0) : a(_a) {
impl.isa = &_NSConcreteStackBlock;
impl.Flags = flags;
impl.FuncPtr = fp;
Desc = desc;
}
};

结构体main_block_impl_0还有一个成员没有分析到: struct main_block_desc_0* Desc;

1
2
3
4
5

static struct __main_block_desc_0 {
size_t reserved;
size_t Block_size;
} __main_block_desc_0_DATA = { 0, sizeof(struct __main_block_impl_0)};

根据成员变量和构造函数,很容易看出,只要是描述了 __main_block_impl_0 的实例大小

至此,所有相关的结构体都分析了,回过头来看看,编译后的源码
再贴一下,翻回去再翻回来挺累的,去掉了转换

1
2
3
4
5
6
7
8
9
10
11
12
13
14
15
16
int main(int argc, const char * argv[]) {

/* @autoreleasepool */ { __AtAutoreleasePool __autoreleasepool;


int a = 0;
// 构造block
void(*block)(void) = ((void (*)())&__main_block_impl_0((void *)__main_block_func_0, &__main_block_desc_0_DATA, a));
a = 1;

// 调用block, FuncPtr也就是__main_block_func_0 入参就是blcok
block->FuncPtr(block)

}
return 0;
}

这就很清楚了,其实就是编译器生成了FuncPtr函数和block结构体,结构体值引用了自动变量(所以说是截获自动变量),调用的时候执行下FuncPtr。还有一个问题 _NSConcreteStackBlock 是个什么类?

__block 说明符

block中给变量赋值编译会报错。两种情况下允许在block中进行赋值操作。

  1. 全局变量、静态全局变量和静态变量
  2. __block 说明符修饰的变量

全局变量与全局静态变量,在block中是直接使用
静态变量则是是用静态变量的指针进行访问

__block 说明符编译后

编译前

1
2
3
4
5
6
7
8
9
10
11
12
13
int main(int argc, const char * argv[]) {

@autoreleasepool {
// insert code here...
__block int a = 3;
void(^block)(void) = ^(){
a *=2;
};
block();

}
return 0;
}

编译后

1
2
3
4
5
6
7
8
9
10
11
12
13
int main(int argc, const char * argv[]) {

/* @autoreleasepool */ { __AtAutoreleasePool __autoreleasepool;
// __block int a = 3 变成了 __Block_byref_a_0 结构体 并初始化为3
__attribute__((__blocks__(byref))) __Block_byref_a_0 a = {(void*)0,(__Block_byref_a_0 *)&a, 0, sizeof(__Block_byref_a_0), 3};
// 初始化block
void(*block)(void) = ((void (*)())&__main_block_impl_0((void *)__main_block_func_0, &__main_block_desc_0_DATA, (__Block_byref_a_0 *)&a, 570425344));
// 执行block
((void (*)(__block_impl *))((__block_impl *)block)->FuncPtr)((__block_impl *)block);

}
return 0;
}

主要变化在main_block_impl_0 结构体,变量a 不在是一个int 而是Block_byref_a_0 结构体

1
2
3
4
5
6
7
8
9
10
11
struct __main_block_impl_0 {
struct __block_impl impl;
struct __main_block_desc_0* Desc;
__Block_byref_a_0 *a; // by ref
__main_block_impl_0(void *fp, struct __main_block_desc_0 *desc, __Block_byref_a_0 *_a, int flags=0) : a(_a->__forwarding) {
impl.isa = &_NSConcreteStackBlock;
impl.Flags = flags;
impl.FuncPtr = fp;
Desc = desc;
}
};

来看看__Block_byref_a_0

__attribute__((__blocks__(byref))) __Block_byref_a_0 a = {(void*)0,(__Block_byref_a_0 *)&a, 0, sizeof(__Block_byref_a_0), 3};

1
2
3
4
5
6
7
struct __Block_byref_a_0 {
void *__isa;
__Block_byref_a_0 *__forwarding;
int __flags;
int __size;
int a;
};

可以看到结构体中的__forwarding 就是指向了自身 int a 被初始化为3
放一张图来说明

block的存储域

问题:

  1. block超出变量作用域可以存在的原因

答案:block从栈上复制到了对堆

  1. forwarding的作用是什么
    答案:
    forwarding保证不管block被分配的堆上还是在栈上,都能被访问到

__block变量的存储域

截获对象

__block变量与对象

objective_c 中__weak的实现原理

Posted on 2018-01-25

weak引用表,是一张hash表。key为对象的地址,value为所有指向该对象的弱引用指针。

  • 实现过程,objc_initWeak
  • SideTable
  • weak使用注意事项:如果大量使用weak修饰符修饰的变量是,最好先赋值给__strong修饰符变量再使用。至于原因下文会详细说明。
  • weak引用表的释放

概况

1
2
id obj = [NSObject new];
id __weak obj1 = obj ;

编译器编译后:

obj;
1
2
objc_initWeak(&obj1, obj);
objc_destroyWeak(&obj1);

通过objc_initWeak 初始化objc1变量,变量objc1超出作用于后通过objc_destroyWeak释放objc1.

objc_initWeak初始化

1
2
3
4
5
6
7
8
9
10
id objc_initWeak(id *location, id newObj) 
{
//首先判断newObj是否为nil,是则直接返回。
if (!newObj) {
*location = nil;
return nil;
}
return storeWeak<DontHaveOld, DoHaveNew, DoCrashIfDeallocating>
(location, (objc_object*)newObj);
}

storeWeak函数 Update a weak variable. 更新弱引用变量,忽略多线程资源竞争逻辑,主要分为三步:

  1. 声明新旧两个SideTabel对象,分别代表旧的weak引用表与新的weak引用表
  2. 如果weak引用已经有所指向,则将weak引用从旧对象的weak引用表中清除
  3. 如果weak引用有新的指向,则将weak引用的注册到新对象的weak引用表中

haveOld 弱引用是否已经有所指向
haveNew 是否有新的指向
CrashIfDeallocating 执行方法时发生Deallocate是否Crash

1
2
3
4
5
6
7
8
9
10
11
12
13
14
15
16
17
18
19
20
21
22
23
24
25
26
27
28
29
30
31
32
33
34
35
36
37
38
39
40
41
42
43
44
45
46
47
48
49
50
51
52
53
54
55
56
57
58
59
60
61
62
63
64
65
66
67
68
69
70
71
72
73
74
75
76
77
78
79
80
81
82
83
84
85
86
87
88
template <HaveOld haveOld, HaveNew haveNew,
CrashIfDeallocating crashIfDeallocating>
static id
storeWeak(id *location, objc_object *newObj)
{
assert(haveOld || haveNew);
if (!haveNew) assert(newObj == nil);

Class previouslyInitializedClass = nil;
id oldObj;
// 声明旧的弱引用表 与 新的弱引用表
SideTable *oldTable;
SideTable *newTable;

// Acquire locks for old and new values.
// Order by lock address to prevent lock ordering problems.
// Retry if the old value changes underneath us.
retry:
if (haveOld) {
oldObj = *location;
oldTable = &SideTables()[oldObj];
} else {
oldTable = nil;
}
if (haveNew) {
newTable = &SideTables()[newObj];
} else {
newTable = nil;
}

SideTable::lockTwo<haveOld, haveNew>(oldTable, newTable);

if (haveOld && *location != oldObj) {
SideTable::unlockTwo<haveOld, haveNew>(oldTable, newTable);
goto retry;
}

// Prevent a deadlock between the weak reference machinery
// and the +initialize machinery by ensuring that no
// weakly-referenced object has an un-+initialized isa.
if (haveNew && newObj) {
Class cls = newObj->getIsa();
if (cls != previouslyInitializedClass &&
!((objc_class *)cls)->isInitialized())
{
SideTable::unlockTwo<haveOld, haveNew>(oldTable, newTable);
_class_initialize(_class_getNonMetaClass(cls, (id)newObj));

// If this class is finished with +initialize then we're good.
// If this class is still running +initialize on this thread
// (i.e. +initialize called storeWeak on an instance of itself)
// then we may proceed but it will appear initializing and
// not yet initialized to the check above.
// Instead set previouslyInitializedClass to recognize it on retry.
previouslyInitializedClass = cls;

goto retry;
}
}

// Clean up old value, if any.
if (haveOld) {
weak_unregister_no_lock(&oldTable->weak_table, oldObj, location);
}

// Assign new value, if any.
if (haveNew) {
newObj = (objc_object *)
weak_register_no_lock(&newTable->weak_table, (id)newObj, location,
crashIfDeallocating);
// weak_register_no_lock returns nil if weak store should be rejected

// Set is-weakly-referenced bit in refcount table.
if (newObj && !newObj->isTaggedPointer()) {
newObj->setWeaklyReferenced_nolock();
}

// Do not set *location anywhere else. That would introduce a race.
*location = (id)newObj;
}
else {
// No new value. The storage is not changed.
}

SideTable::unlockTwo<haveOld, haveNew>(oldTable, newTable);

return (id)newObj;
}

objc_destroyWeak 函数,

1
2
3
4
5
6
void
objc_destroyWeak(id *location)
{
(void)storeWeak<DoHaveOld, DontHaveNew, DontCrashIfDeallocating>
(location, nil);
}

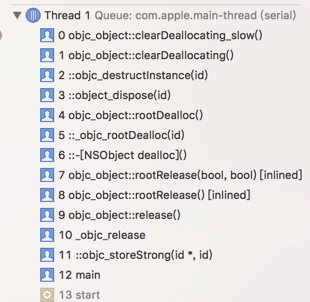
weak引用表的释放

先上一张图,一图胜千言

objc_object::clearDeallocating()函数

1
2
3
4
5
6
7
8
9
10
11
12
13
14
15
16
17
void
objc_object::clearDeallocating_slow()
{
assert(isa.nonpointer && (isa.weakly_referenced || isa.has_sidetable_rc));

//1、去到weak引用表
SideTable& table = SideTables()[this];
table.lock();
if (isa.weakly_referenced) {
//2、清除所有的weak引用
weak_clear_no_lock(&table.weak_table, (id)this);
}
if (isa.has_sidetable_rc) {
table.refcnts.erase(this);
}
table.unlock();
}

来看看weak_clear_no_lock函数的实现

1
2
3
4
5
6
7
8
9
10
11
12
13
14
15
16
17
18
19
20
21
22
23
24
25
26
27
28
29
30
31
32
33
34
35
36
37
38
39
40
41
42
43
44
45
46
void 
weak_clear_no_lock(weak_table_t *weak_table, id referent_id)
{
objc_object *referent = (objc_object *)referent_id;
// 1、从weak表中,获取referent_id的 weak引用实体 也就是weak_entry_t

weak_entry_t *entry = weak_entry_for_referent(weak_table, referent);
if (entry == nil) {
/// XXX shouldn't happen, but does with mismatched CF/objc
//printf("XXX no entry for clear deallocating %p\n", referent);
return;
}

// zero out references
weak_referrer_t *referrers;
size_t count;

// 2、获取weak_entry_t中的referrers, 也就是所有引用了referent_id 的弱引用对象,这是一个数组
if (entry->out_of_line()) {
referrers = entry->referrers;
count = TABLE_SIZE(entry);
}
else {
referrers = entry->inline_referrers;
count = WEAK_INLINE_COUNT;
}
// 3、遍历数组,将所有弱引用对象赋值为 nil
for (size_t i = 0; i < count; ++i) {
objc_object **referrer = referrers[i];
if (referrer) {
if (*referrer == referent) {
*referrer = nil;
}
else if (*referrer) {
_objc_inform("__weak variable at %p holds %p instead of %p. "
"This is probably incorrect use of "
"objc_storeWeak() and objc_loadWeak(). "
"Break on objc_weak_error to debug.\n",
referrer, (void*)*referrer, (void*)referent);
objc_weak_error();
}
}
}
// 4、将entry从weak引用表中移除
weak_entry_remove(weak_table, entry);
}

这就很清楚了,主要步骤:

  1. 从weak表中,获取referent_id的 weak引用实体 也就是weak_entry_t
  2. 获取weak_entry_t中的referrers, 也就是所有引用了referent_id 的弱引用对象,这是一个数组
  3. 遍历数组,将所有弱引用对象赋值为 nil
  4. 将entry从weak引用表中移除

回答刚开始提出的问题:为什么如果大量使用weak修饰符修饰的变量时,最好先赋值给strong修饰符变量再使用?

因为weak修饰符修饰的变量生命周期分为:创建、存储、销毁三个过程,其中还涉及Hash以及数组的遍历等操作。而strong修饰符只是简单引用计数+1和-1,相对于strong修饰符来说weak修饰符更消耗性能。

以上不是主要原因,因为使用weak修饰符修饰的变量时,即是使用注册的autoreleasepool中的变量,这是为了确保weak变量在使用过程中,不会被置为nil。而如果大量使用weak变量的话,就会导致weak变量多次注册到autoreleasepool,为了避免这种情况,最好先赋值给__strong 变量再使用

iOS运行时Runtime

Posted on 2017-02-08

基础概念

SEL

SEL是方法选择器,即方法的ID。结构体如下,源码中没有objc_selector具体的定义。
但其实就是映射到方法的C字符串。不同类的同名方法具有相同的选择器,方法名相同单变量类型不同也会导致它们具有相同的选择器

1
2
3
// An opaque type that represents a method selector.

typedef struct objc_selector *SEL;

id

id的结构体定义如下:

1
typedef struct objc_object *id;
1
2
3
4
5
6
7
8
9
10
11
12
struct objc_object {
private:
isa_t isa;

public:

// ISA() assumes this is NOT a tagged pointer object
Class ISA();

// getIsa() allows this to be a tagged pointer object
Class getIsa();
}

objc_object结构体包含一个isa_t指针,isa_t是一个联合体,根据isa指针可以找到对象所属的类,isa还涉及到 tagged pointer 的相关知识点。

Class

Class 是一个指向 objc_class结构体的指针
objc_class继承自 objc_object结构体,objc_class的很多方法都基于它的几个成员实现的。

1
typedef struct objc_class *Class;
1
2
3
4
5
6
7
8
9
10
struct objc_class : objc_object {
// Class ISA;
Class superclass;
cache_t cache; // formerly cache pointer and vtable
class_data_bits_t bits; // class_rw_t * plus custom rr/alloc flags

class_rw_t *data() {
return bits.data();
}
};

为了处理类与对象的关系,Runtime创造了元类(Meta Class,类对象所属的类型就是元类,它用来表示类本身所具备的元数据。每个类只有一个类对象,每个类对象只对应一个元类

实例对象的isa指针指向类对象的,类对象的isa指针指向元类
根元类的isa指针指向的是自己,而超类指向的NSObject,NSObject的超类的为nil,也就是NSObject没有超类

cache_t

cache_t 定义如下,方法缓存列表

1
2
3
4
5
struct cache_t {
struct bucket_t *_buckets;
mask_t _mask;
mask_t _occupied;
}

buckets是一个hask表,存储了调用过的方法体IMP。

1
2
3
4
5
6

struct bucket_t {
private:
cache_key_t _key;
IMP _imp;
}

cache为方法调用进行了性能优化,每次方法调用了先从cache中查找,命中就返回方法体IMP,否则再从isa指向的方法列表遍历查找能够响应消息的方法

class_data_bits_t

class_data_bits_t结构体定义如下

1
2
3
4
5
6
7
8
9
10
11
12
13
14
15
16
17
18
19
20
21
22
23
24
25
26
27
28
29
30
31
32
33
34
35
36
struct class_data_bits_t {

// Values are the FAST_ flags above.
uintptr_t bits;

private:
bool getBit(uintptr_t bit)
{
return bits & bit;
}

void setBits(uintptr_t set)
{
uintptr_t oldBits;
uintptr_t newBits;
do {
oldBits = LoadExclusive(&bits);
newBits = updateFastAlloc(oldBits | set, set);
} while (!StoreReleaseExclusive(&bits, oldBits, newBits));
}

void clearBits(uintptr_t clear)
{
uintptr_t oldBits;
uintptr_t newBits;
do {
oldBits = LoadExclusive(&bits);
newBits = updateFastAlloc(oldBits & ~clear, clear);
} while (!StoreReleaseExclusive(&bits, oldBits, newBits));
}

public:

class_rw_t* data() {
return (class_rw_t *)(bits & FAST_DATA_MASK);
}

class_data_bits_t 包含了一个 bits,这个指针跟不同的FAST_前缀的flag掩码做按位与操作,获取不同的数据

FAST_前缀的flag掩码

1
2
3
4
5
6
7
8
9
// class is a Swift class
#define FAST_IS_SWIFT (1UL<<0)
// class or superclass has default retain/release/autorelease/retainCount/
// _tryRetain/_isDeallocating/retainWeakReference/allowsWeakReference
#define FAST_HAS_DEFAULT_RR (1UL<<1)
// class's instances requires raw isa
#define FAST_REQUIRES_RAW_ISA (1UL<<2)
// data pointer
#define FAST_DATA_MASK 0x00007ffffffffff8UL

bits中其他的Fast_都是存储了相关标志位bool值,FAST_DATA_MASK 则存储了指向class_rw_t的指针

1
2
3
class_rw_t* data() {
return (class_rw_t *)(bits & FAST_DATA_MASK);
}

class_ro_t

objc_class 包含了 class_data_bits_t, class_data_bits_t存储了 class_rw_t指针, class_rw_t有包含了了 class_ro_t

class_ro_t的结构体定义:

1
2
3
4
5
6
7
8
9
10
11
12
13
14
15
16
17
18
19
20
21
22
struct class_ro_t {
uint32_t flags;
uint32_t instanceStart;
uint32_t instanceSize;
#ifdef __LP64__
uint32_t reserved;
#endif

const uint8_t * ivarLayout;

const char * name;
method_list_t * baseMethodList;
protocol_list_t * baseProtocols;
const ivar_list_t * ivars;

const uint8_t * weakIvarLayout;
property_list_t *baseProperties;

method_list_t *baseMethods() const {
return baseMethodList;
}
};

class_ro_t 中 method_list_t、property_list_t与property_list_t都继承自entsize_list_tt,protocol_list_t 存储了 protocol_ref_t列表(也就是protocol_t指针列表)。class_ro_t 存储的大多都是编译时信息就确定的信息

class_rw_t

class_rw_t结构体定义

1
2
3
4
5
6
7
8
9
10
11
12
13
14
15
16
struct class_rw_t {
// Be warned that Symbolication knows the layout of this structure.
uint32_t flags;
uint32_t version;

const class_ro_t *ro;

method_array_t methods;
property_array_t properties;
protocol_array_t protocols;

Class firstSubclass;
Class nextSiblingClass;

char *demangledName;
}

class_rw_t 提供了运行时类拓展的能力,而class_ro_t存储的大多是编译时就确定的信息。虽然二者都包含了类的方法、属性以及协议等信息,但列表的实现方式不尽相同。
class_rw_t中的 method_array_t、property_array_t与protocol_array_t 都继承自list_array_tt,list_array_tt真正的为运行时提供了拓展能力,因为list_array_tt可以存储list指针,内容有三种:

  1. 空
  2. entsize_list_tt指针
  3. entsize_list_tt指针数组

realizeClass

Category

Method

IMP

Ivar

objc_property_t

protocol_t

消息发送

objc_msgSend流程

  1. 检测这个selector是否要忽略
  2. 检测target是否为nil
  3. 从cache中查找对应的函数
  4. cache找不到,就从方法分发表中查找
  5. 方法分发表中还找不到就到超类中查找,直到NSObject
  6. 如果还找不到就进入动态方法解析

动态方法解析

消息转发

#健壮的实例变量 (Non Fragile ivars)

Objective-C Associated Objects

Method Swizzling 方法替换

总结

Http 网络协议

Posted on 2017-01-17

网络基础

tcp/ip协议族
ip协议
tcp协议
dns服务
uri与url

简单http协议

http不保存状态
持久链接节省流量:1.长连接(keep-alive); 2.管线话(pipeline)
使用cookie的状态管理

http报文内的http信息

请求报文与响应报文结构

编码提升传输速率:
1.压缩;
2.分块
Content-Type:
Range:获取内容范围
内容协商返回最合适的内容

返回结果状态码

2xx成功
3xx重定向
4xx客户端失败
5xx服务端失败

与http协作的web服务器

通信数据转发程序:代理、网关、隧道
代理:

使用代理服务器的理由:
1.利用缓存减少网络流量
2.访问控制

代理的分类:缓存代理、透明代理

网关:网关与代理很像,而网关能使通信线路上的服务器提供非http协议服务

http首部

首部字段格式:

首部字段名称:字段值
4种首部字段类型:

  1. 通用首部字段(General Header Fields)
  2. 请求首部字段
  3. 响应首部字段
  4. 实体首部字段

Cookie:Cookie的工作机制是用户识别与状态管理。
用户识别本身也算一种状态管理。

确保web安全的https

http协议中有可能存在信息窃听与身份伪装等安全问题,使用https可以有效地防止这些问题。
http的缺点:

  • 使用明文通信,信息有可能被窃听
  • 不验证通信方,有可能遭遇身份伪装
  • 无法验证报文的完整性,有可能信息被篡改

http + 加密 + 认证 + 完整性保护 = https

加密方式:

  1. 对称密钥加密:只有一个密钥,加解密都使用同一个密钥
  2. 非对称密钥加密,包含公钥与私钥,公钥是公开的,任何都可以获取,用于加密,私钥用于解密

https采用混合加密机制:

  1. 使用非对称加密方式交换稍后在对称密钥加密要使用的私有密钥
  2. 在确保交换的私钥安全的前提下,使用对称密钥加密方式加密

证明公开密钥正确性的证书

但是非对称密钥加密还是存在一些问题:无法证明公钥是货真价实的公钥

为了解决上述问题,可以使用数字证书认证机构(CA,Certificate Authority)和其相关的机构颁发的公开密钥证书

https的安全通信机制

  1. 客户端发送Client hello 报文开始SSL通信,报文中包含支持的SSL版本、加密组件列表(所使用的加密算法级以及密钥长度)
  2. 服务端可以进行SSL通信时,会以Server Hello报文作为应答,报文中包含SSL版本、加密组件,加密组件是从接收到的客户端加密组件列表中筛选出来的。
  3. 之后服务端发送Certificate报文,包含公开密钥的证书
  4. 最后服务器发送Server Hello Done 报文通知客户端,最初阶段的SSL握手协商部分结束
  5. SSL握手结束后,客户端以 Client Key Exchange 报文作为回应,该报文包含通信加密中被称为Pre-master secret 的随机密码串。该报文已使用步骤3中的公钥进行加密
  6. 接着客户端会继续发送 Change Cipher Spec 报文,提示服务端后续的通信将使用 Pre-master secret 密钥加密
  7. 客户端发送Finished。该报文包含链接至今全部报文的整体校验值。此次握手是否成功,以服务端是否能正确解密该报文为准。
  8. 服务端发送 Change Cipher Spec 报文
  9. 服务端发送 Finished 报文
  10. 服务端与客户端的Finished报文交换完毕后,SSL链接就算是建立完成。此处开始进行应用层通协议信,即发送Http响应
  11. 应用层协议通信
  12. 最后由客户端断开SSL链接。断开连接时,客户端发送close_notify报文。

SSL速度慢:1、网络通信慢;2、大量消耗CPU及内存,导致处理速度慢

确认访问用户身份的认证

SSL客户端的认证步骤

  1. 服务器收到需要认证的资源请求,就会发送Certificate Request 报文,要求客户端提供客户端证书
  2. 客户端把客户端证书信息以Client Certificate报文的形式发送给服务端
  3. 服务端验证通过后,领取证书内的公开密钥,然后开始HTTPS通信

SSL客户端认证采用双因素认证

第一个认证因素的客户端证书,用来认证客户端计算机,另一个认证因素的密码则用来认证来自用户本人

基于表单认证

Session管理以及Cookie的应用
由于Http是无状态协议,已认证通过的用户状态无法在协议层面保存。即无法实现状态管理,于是可以使用Cookie来管理Session

基于HTTP功能追加的协议

消除瓶颈的SPDY协议

SPDY功能:

  1. 多路复用
  2. 赋予请求优先级
  3. 压缩HTTP首部
  4. 推送功能
  5. 服务器提示功能

全双工通信的WebSocket

WebSocket的主要特点:

  1. 推送功能
  2. 减少通信量

WebSocket握手过程

HTTP/2.0

改善用户使用Web是的速度体验

12

Mochangxing

15 posts
6 tags
© 2018 Mochangxing
Powered by Hexo v3.7.1
|
Theme — NexT.Muse v6.1.0